I attended a MARC meeting last night, and the topic of transcription came up. It was stated that some people talk too fast for the person writing the information down during a local emergency. When communications are flying back and forth on the radio during an active situation, it’s nearly impossible for a human note-taker to capture every detail accurately and in real time.
I immediately thought: what if the computer could do the listening for us?
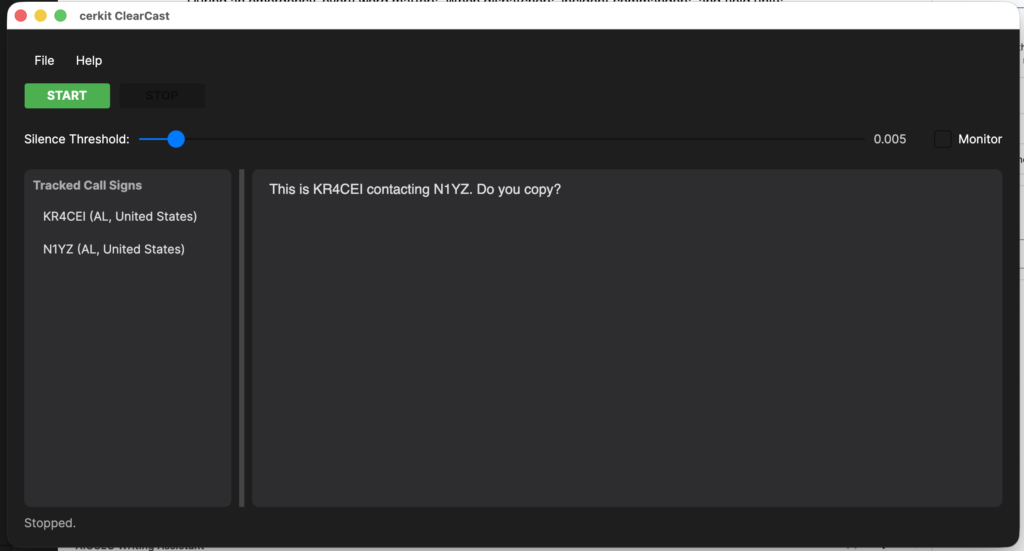
That idea quickly turned into a working application. I set out to create cerkit ClearCast — a cross-platform desktop program (running on Windows, macOS, Linux, and Raspberry Pi) that allows the user to select an attached audio interface, enabling the computer to “hear” connected radios. ClearCast then listens for audio from the radio(s), and when it detects speech, it samples the audio and sends it to the Google Gemini AI system (GenAI), where it is converted to text that is then displayed on the program’s main screen.
Here’s how cerkit ClearCast works under the hood.
Capturing Audio from the Radio
The first challenge is getting the radio’s audio into the computer in a way the software can work with. This is where an audio interface comes in. A device like the Focusrite Scarlett 18i8 acts as a bridge between the analog audio output of a radio and the digital world of the computer. You connect the radio’s audio output (typically from a speaker or headphone jack) to one of the interface’s inputs, and the interface digitizes that signal and makes it available to the operating system as an audio input device.
The application uses PortAudio, a cross-platform audio I/O library, to interact with the audio interface. When the application launches, it enumerates all available audio input devices on the system and presents them in a drop-down list so the user can choose exactly which device to capture from. This means you’re not locked into a single hardcoded device — if you have multiple audio interfaces, built-in microphones, or virtual audio devices, they’ll all appear in the list. The application also remembers your selection between sessions, so you only have to pick your device once.
Once the user selects a device and clicks Start, the application opens an audio input stream on that device, configured for:
- 16,000 Hz sample rate — this is the standard rate for speech recognition and keeps data sizes manageable.
- Mono (single channel) — radio communications are mono by nature, so there’s no need for stereo.
- 32-bit floating point samples — this gives us high-precision audio data to work with before conversion.
As audio data flows in from the interface, PortAudio invokes a callback function that receives small buffers of raw audio samples. These buffers are immediately queued up for processing.
Detecting Speech and Sampling Audio
Not every moment of a radio channel contains useful audio. There are long stretches of silence, static, or squelch noise between transmissions. Sending all of this to the AI for transcription would be wasteful — both in terms of API usage and processing time.
To solve this, the application implements a silence detection mechanism using RMS (Root Mean Square) analysis. RMS is a mathematical measure of the “energy” or “loudness” of an audio signal. The application continuously calculates the RMS value of incoming audio chunks and compares it against a configurable threshold. The user can adjust this threshold via a slider in the UI to fine-tune sensitivity for their specific radio and environment.
Here’s the flow:
- Buffering — Raw audio samples are accumulated from the PortAudio callback into a working buffer.
- Chunking — Once enough samples have been collected to fill a 3-second window (48,000 samples at 16 kHz), the application carves out a chunk for analysis.
- RMS Check — The RMS energy of the chunk is calculated. If it falls below the silence threshold (defaulting to ~0.005, or roughly -46 dBFS), the chunk is discarded as silence and the application continues listening.
- WAV Encoding — If the chunk does contain speech (i.e., it exceeds the threshold), the raw floating-point samples are converted to 16-bit PCM format and wrapped in a standard WAV file header. This produces a self-contained audio clip ready for the AI.
This approach means the application only sends meaningful audio to the cloud, keeping things efficient and responsive.
Sending Audio to Google Gemini for Transcription
Once a valid audio chunk has been captured and encoded as a WAV file, it’s time to send it to the AI. The application uses the Google Gemini API (specifically the gemini-2.5-flash model) for speech-to-text transcription.
The process works like this:
- API Initialization — When the user clicks “Start,” the application initializes a Gemini API client using the provided API key. This key is securely stored locally so the user doesn’t have to re-enter it each time.
- Building the Request — Each audio chunk is packaged as a multi-part request containing:
- The WAV audio data as an inline binary blob.
- A text prompt instructing the model to transcribe the audio exactly as spoken, with no additional commentary or formatting.
- Sending to Gemini — The request is sent asynchronously to the Gemini
GenerateContentendpoint. The AI processes the audio and returns the transcribed text. - Displaying Results — The transcribed text is appended to the main transcript area of the application’s UI in real time. As new transmissions come in, the transcript grows, giving the user a running log of everything said on the radio.
The entire pipeline — from audio capture through AI transcription to on-screen display — operates asynchronously. This means the UI remains responsive while audio is being captured, processed, and transcribed in the background.
Getting a Google Gemini API Key
To use this application, you’ll need a Google Gemini API key. The good news is that getting started is free.
Head over to Google AI Studio and sign in with your Google account. From there, you can create a new API key in just a few clicks — look for the “Get API Key” option in the left-hand menu. Google offers a free tier that includes a generous number of requests per minute, which is more than enough to start testing the application and getting a feel for how it performs with your specific radio setup.
Once you’re ready to move the application into full-time use — what we’d refer to as “Production” — you’ll need to attach a billing account to your Google Cloud project. The free tier has rate limits that could be hit during sustained, high-traffic radio events, and a billing account ensures uninterrupted service. Google’s pay-as-you-go pricing for the Gemini API is very reasonable, especially considering the value of not missing critical communications during an emergency.
The User Experience
The application features a clean, dark-themed interface built with Avalonia UI, a cross-platform .NET UI framework that runs natively on both Windows and macOS. The main screen includes:
- An API key field (masked for security) where the user enters their Google Gemini key.
- An audio device drop-down that lists all available input devices, letting the user select which interface to capture from.
- Start/Stop buttons to control the listening session.
- A silence threshold slider for adjusting speech detection sensitivity.
- A monitor toggle that lets the user hear the incoming radio audio through their computer’s speakers — useful for verifying the audio connection.
- A transcript area that displays the real-time transcription output in a clean, monospaced font.
- A status bar that shows the current state of the application (listening, transcribing, idle, etc.).
Why This Matters
During an emergency, every word matters. When dispatchers, incident commanders, and field units are communicating rapidly over the radio, critical details can be lost if the person logging the traffic can’t keep up. cerkit ClearCast provides a safety net — an AI-powered assistant that never gets tired, never falls behind, and captures every transmission faithfully.
It’s not a replacement for a skilled operator, but it’s a powerful supplement. Having a complete, searchable text log of radio communications after an event can be invaluable for after-action reviews, accountability, and training.
What started as a passing thought at a MARC meeting is now cerkit ClearCast — and I’m excited to continue refining it.